The Reflection

Since the time to work on this project is almost over, I can now reflect on the outcome, the group work, the planning and the other important things that were a part of it. We have basically been working on the page for two months now and I think time wise, we have done really well. We agreed to have the page finished before Easter so we could spend the time during the holiday to make smaller changes, comment the code, and look for errors or way to improve things that we did not like that much. Luckily most of our group worked really hard to reach this goal and when we went home, all the big parts, except for making it responsive where taken care of. During this development, we used GitHub as Rob suggested and we got to understand it pretty well. It was a very useful way of sharing code and keeping track of issues and things missing. Me and Tina created a lot of Issue files that could easily be closed once something was fixed. I have been uploading onto GitHub from the very start of the working process and every time I ran into an issue with the code, I could easily go back to an older version or track all the additions I had made. This was the first time ever, I worked on the development of a webpage but I can imagine that managing the code without GitHub would turn out very chaotic. I am happy that I now know how to use it and can keep using it for projects in the future.

Another thing I did along with the coding was blogging. It was a good way to reflect on things I had learned as well as a possibility for us to understand the thought process of our fellow group members. In case I forget something I might need for upcoming projects, I can now always go back and look at how I did it before.

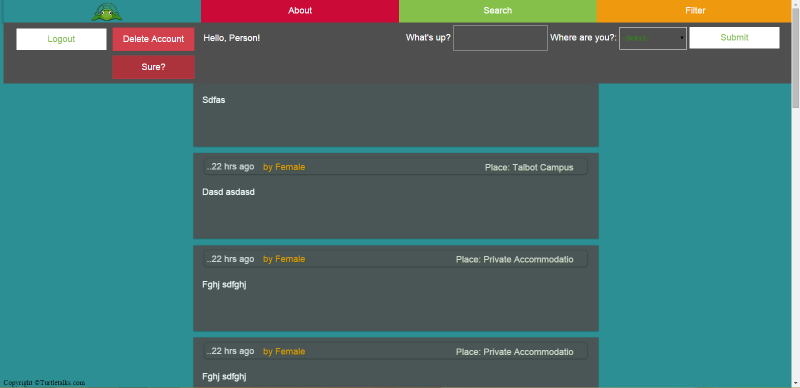
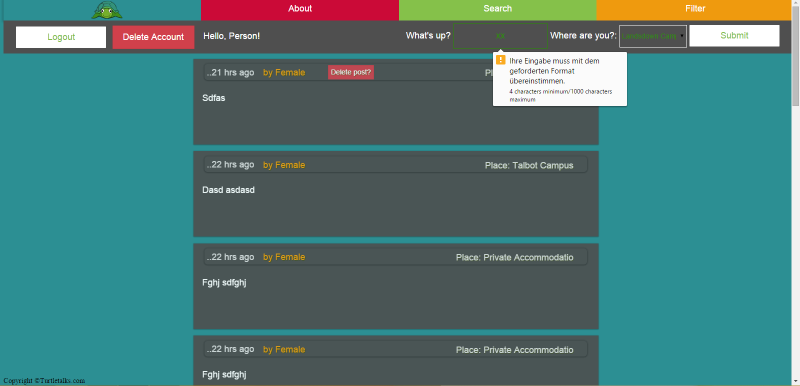
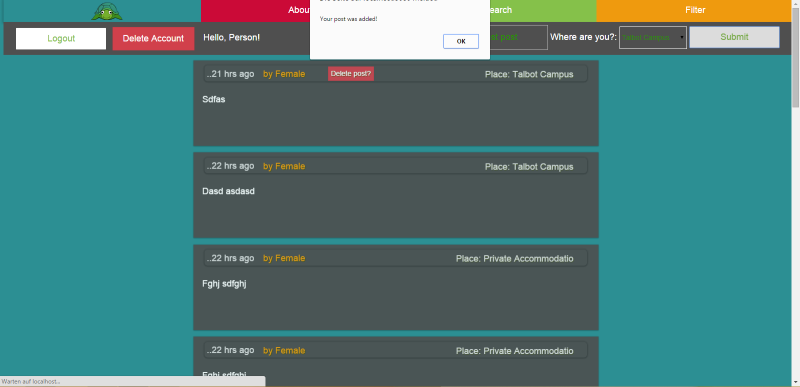
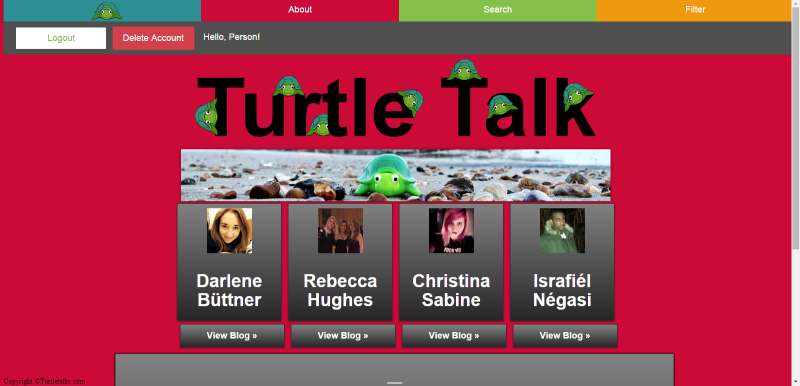
Reflecting on our project now, I am very satisfied with the outcome. Our page does not only meet the basic needs but because we were finished with the coding early, we had time to add extras such as a logo, more PHP functions and a nice design. Of course, we focused on the PHP first, since it is the main part of this project bur once I had it done, we wanted to explore all the other ways we could improve our page.

Looking back at the beginning of the project, I am very happy with the way the planning went on. Tina joined our group a bit later but she helped from the very beginning and was enthusiastic about work and ended up redesigning and improving the welcome page Becky made with Bootstrap, after we decided not to use Bootstrap, from the very scratch. We all contributed logo ideas and Tina did a lot of research on the name. We also all looked into other projects similar to ours to make sure we understood what we were dealing with. We all showed up for our group meetings, except for Rafiel who disappeared after the second one and we stayed in a lot after workshops to work on the project and we all developed a clear idea on what the page was supposed to look and be like. Since my group members said that they were not very secure with coding, I ended up writing most of the PHP for the page though while my group members contributed in other important ways. I did not mind the extra work, but because I came from basically no web design and PHP background, I had to do a lot of research on it but now, I feel pretty secure with it. Of course I know I have only scratched the surface of it and there is way more to learn but I enjoyed the coding. Since the project is about us all understanding the code and working on it though, I also spent a lot of time explaining my group mates how to do things and going through the code with them. Becky then managed to write PHP for the search page as well as code for making the page responsive (she also worked on a report button that we sadly could not integrate) and Tina did the about-us page, did research on anonymity online, wrote a text for the page telling the users what it was supposed to be used for (and what not) and helped me with the design and CSS part. She also stayed in late with me a lot to make sure that she understood how everything worked and we could get it done in time. I also commented all the code so my group members could go through and ask questions about it in case they had not understood anything. Rafiel wanted to contribute doing a ‘like on Facebook’ button but he never replied to our messages again. In general, I think we all improved our knowledge in a lot of different ways but now we should be at a point where we know what is going on with the backend as well as the frontend of our page as well as having a pretty decent understanding of the area our page is in.

Making the page responsive

Eventually we still had to make our page responsive, so it could be used on different devices without any problems. Making a page responsive is an important part of its development since nowadays, a lot of users do not longer stick to only laptops or PC’s to use the internet. According to the Office for national Statistics for example “access to the Internet using a mobile phone more than doubled between 2010 and 2014, from 24% to 58%.” Looking at numbers like this, it can easily be seen how important it is that the user is enables to access the page from other devices.

Originally, Becky wanted to take care of making our page responsive. Since we decided not to use Bootstrap, we had to do more work ourselves but we made the decision so we could not just improve our PHP but also our CSS skills working on the project. Becky started off looking at different resources and gaining knowledge about how to turn an already existing page responsive. But she could not quite figure out how to do it, so she asked for help and I also send her some links and explained what I knew about responsiveness. Since I previously looked into it for a bit as well as talked to the other students, I knew about media queries and how to use them to change the way the page looks like depending on screen size. Becky then did some more research and wrote some code, but she could not quite get it working, so she asked me if I could give her an example of how to use the media query and to help her, I used one of them to make the page responsive to an iPad mini (1024px max width). We thought that once Becky saw and understood the query, she could add more of them. To make the page look nice and usable on a smaller screen, I had to work with spaces and sizes. The layout would change if the screen size was changed, and slip into the new line. Because the header is fixed though, it ended up being really big and cover up the posts. To make the header thinner, I changed the size of two of the buttons. After this was done, the rest would fit into one line and not be in front of the posts. You can see the two versions here:

Before:

Screenshot (315)

After:

Screenshot (299)

I then uploaded the following code onto Github, so Becky could look at the query.


/*Media Queries for making to responsive to smaller screen sizes.*/

@media screen and (max-width: 1400px) {

.box_post_gender {
 min-height: 70px;
 color: white;
 margin: auto;
 font-family:sans-serif;
 font-size: 20px;
 background-color: #4F4F4F;;
 width: 100%;
 z-index: 100;
 top: 50px;
 position: fixed;
}

.box_hello {
 color: white;
 font-family: sans-serif;
 font-size: 20px;
 text-align: center;
 margin-left: 20px;
 float: left;
 line-height: 70px;
}

.box_hello2 {
 display: none;
}

.box_post_gender_content {
 text-align: right;
 margin-right: 35px;
 display: inline-block;
 float: right;
 margin-top: 5px;
}
 
.delete_toggle {
 width: 150px;
 height: 48px;
 cursor: pointer;
 text-align: center;
 line-height: 10px;
 background: #d1404b;
 border: 1px solid #be3b45;
 border-radius: 2px;
 color: #fff;
 font-family: 'Exo', sans-serif;
 font-size: 20px;
 font-weight: 500;
 display: inline-block;
 position: relative;
 left: 0px;
 top: 3px;
}
 
.delete {
 width: 150px;
 height: 48px;
 line-height: 50px;
 text-align: center;
 background: #d1404b;
 border: 1px solid #be3b45;
 cursor: pointer;
 border-radius: 2px;
 color: #fff;
 font-family: 'Exo', sans-serif;
 font-size: 20px;
 font-weight: 500;
 margin-left: 82px;
 text-decoration: none;
}

.delete a {
 text-decoration: none;
 color: white;
}
 
input[type="submit"] {
 width: 60px;
 height: 48px;
 background: #fff;
 border: 1px solid #fff;
 cursor: pointer;
 border-radius: 2px;
 color: #85c14a;
 font-family: 'Exo', sans-serif;
 font-size: 15px;
 font-weight: 500;
 padding: 6px;
 margin-top: 10px;
}

input[type="submit"]:active{
 opacity: 0.6;
}

input[type="submit"]:hover{
 opacity: 0.8;
}
}


Becky worked for a day on the responsiveness for smaller screen sizes. Then she messaged me again, saying that she still  struggled with doing it and that she had only partly made it responsive to one smaller size and that she might not be able to finish it on her own, so she put her code onto Github, so me and Tina could have a look and finish it. I worked on it then using more media queries and in the following, you can see some pictures that show how it turned out. I then updated Github again, so Becky could look at and go through the code.

Screenshot (311)

Screenshot (312)

Screenshot (313)

Screenshot (314)

References:

Part of Internet Access, Households and Individuals, 2014. Available from: http://www.ons.gov.uk/ons/rel/rdit2/internet-access—households-and-individuals/2014/stb-ia-2014.html [Accessed 19th April, 2014].

Unknown, Unknown. Am I Responsive? Available from: http://ami.responsivedesign.is/ [Accessed 19th April, 2014].

The Page

In the following, you can see our page step by step. I will go through its functions and quickly explain what the user sees and what happens once he interacts with it.

If the page is accessed for the first time, the user will end up here. It is the login/signup page and the user has the option to either just log in..

Screenshot (297)

..or to create a new account after he clicked the button saying “No account”. A form toggles up asking the user to enter some things needed for using the account: Gender, Name, Password and the Student ID. He also has to enter his password twice to ensure that he has not misspelled it. All the forms have different conditions the user has to stick to. The password for example has to contain at least one number to enhance security. If he does not stick to those, he will be informed and has a chance to change his details. After entering those things correctly, he will receive a message confirming his registration. His details were saved into the users table that was set up into the database. He then has the option to either access the main site by logging in or returning later to do so. If he chooses to log in, a query searches the database for his name and password and if they are found, he will be logged in and a session is started.

Also, he will from then on see the following page. It is structured into two main parts, the navigation bar that enables the user to access other pages and the body of the pages displaying the posts. The user can read and scroll through those posts and using the form integrated into the navigation bar, he can contribute by writing his own posts.

Screenshot (298)

In case the user changes his mind, he can delete them afterwards. As you can see in the picture, the user is only enabled to delete his own posts since only those contain a delete button. If he chooses to add a post, the data entered into the form will be saved to the database as well as his ID, a timestamp and a unique ID for the post. So, even though the posts are displayed anonymously, it can still be kept track of the person who made them. This might be important in a case of misuse and also to enable the person to only delete their own. If he chooses to delete a post, the post will be removed from the database, noting that the unique post ID will be removed as well but even though it is not there anymore, it can never be used again.

Screenshot (289)

The post boxes display the content as well as the gender, the location and a time function telling the user how long ago certain posts were made.

If the user wants to delete his account, he can easily do that using the delete button integrated into the navigation bar. To avoid accidents, the button does not directly delete the account but makes another button toggle down that also has to be clicked. The principal behind it is very similar to the ‘delete post’ buttons.

Screenshot (290)

If the user chooses to write a post, he has to stick to the given word limit which is a 1000 words maximum and 4 words minimum. If he does not, a window will inform him again and he won’t be able to submit the post until he changes it.

Screenshot (291)

Once he clicked ‘submit’ the post will be submitted and the user will receive a message confirming that.

Screenshot (292)

The user can navigate using the navigation bar and access the four different pages. The first one is the “about us” page, telling him all about the creators of the page. If the users feels like gaining more information about the development, he can click one of the “view blog” buttons to be redirected to our blogs. In the following, he can read more about the page.

Screenshot (294)Screenshot (293)

The search page enables the user to search through all of the already existing posts using one or more words/numbers/ect. The results will be displayed after he clicked the button saying “Go!” Also, the posting form in the navigation bar is hidden for this page.

Screenshot (295)

The last page is the filter page. It enables the user to filter the posts by location which makes it easier so read what happenes around him. The posting form is replaced with the filter form, letting the user choose the location. By default all the posts will be displayed.

Screenshot (296)

At all this time, the user can quickly logout using the “logout” button that is never hidden as well as delete his account using the “delete” button. If he chooses to log out, the session will be destroyed and the user will be redirected to the login/signup page.

Holidays and what I have been doing

Since I was going home for the holidays, my group and I decided to finish most of the project before the Easter break. To do so, we had a group meeting on the last Friday before and because during this group meeting we noticed that a lot of things still had to be done, me and Tina decided to stay at Uni a bit longer to finish the work. During this night, Tina worked on the aboutus.php page and since I had the PHP for our page finished at this point, focussed a bit on the design aspect as well as I helped other course members with their PHP. Beccy could not stay because she had to go home but she said she would take care of making the page responsive. Also, she worked on the PHP for the search engine and because she finished it this day, I integrated it into the page.  At the end of this, we had a functional site with a newer design as well as the aboutus page working.

I then went home for holidays and spent some time ‘cleaning up’ the code, like taking out things we did not need anymore and formatting. I also changed some small things, like replacing ‘ucfirst’ with ‘ucwords’ in some cases, so not only the first letter of the first word would be capital but the first of every word. That was important for example for the locations that consisted of two words instead of one. I then looked through the file on my computer and the one on github and uploaded all the changes I had made. To double check if the github version was working, I downloaded the .zip file and looked at the page using XAMPP. I then did some more edits and in the end, the version was up to date.

After all of this was done and we were sure that we would not make any major additions to the code, I started commenting the PHP. Once I am back, I offered to meet up with my teammates to go through all the code and comments together so we would all have an understanding of everything.

Filtering the posts by location

Since our group had most of the basic PHP finished at this point, we had time to focus on more difficult things to improve the user experience on our page. So far the user was able to set up an account, log in, post, delete their posts, delete their account, look through other posts, see how long ago they were created and where and  if they were created by a female or a male person. Also they could visit the aboutus page to learn about who created the page. To improve the page, we still wanted to add a ‘search by words’ function as well as a ‘filter’ function. To provide more information, Tina also thought that it would be a nice idea to make the about us page a bit more complex. To get those things done, we agreed to each look at one of those things until our next meeting, mine was the ‘filter by location’ option.

What we thought for that was a simple concept. The ‘filter’ page was supposed to be accessed using the navigation bar, Tina originally created for the about us page and I integrated into the other pages. Then another page should appear, looking very similar to the normal ‘posting’ page. Just that the form for posting should be replaced by another form (including a dropdown menu for filtering by location). The html part for that was done quickly, I simply had to create another file (filter.php), integrate another field into the navigation bar and then link them up. Next, I created a new form very similar to the form I previously used when I wrote the code for the posting process, a dropdown menu including all the locations and a submit button.


<form class="sort_place" action="filter.php" method="post">

Only show posts from: <select name="sort" class="dropdown">

                            <option value="">--Select--</option>

                            <option value="talbot campus">Talbot Campus</option>

                            <option value="landsdowm campus">Landsdown Campus</option>

                            <option value="halls">Halls</option>

                            <option value="private accommodation">Private Accommodation</option>

                            <option value="unilet">Unilet</option>

                            <option value="town">Town</option>

                            <option value="none">None</option>

                        <input type="submit" onClick="redirect();" />

                        </select>

                    </form>

I also integrated the navigation bar into the new file so it would also be accessible from the new page and enable to user to navigate back to the ‘posting page’ or to any of the other pages and wrote some css to make it all look nice. But it still would not work because the PHP was missing.

I did some research even though I had quite an idea of how I could get there but I wanted to make sure. I read some threads on Stackoverflow where other people were asking questions very similar to me and looked at the suggestions they got but they did not really got me to where I wanted to get. I will reference some of them at the end of this post though.

After that research, I started writing my own code.  It ended up not being that complicated and looking back at all the hours I have spent doing research and coding in PHP I noticed my improvement. During all this time, I gained knowledge and doing this last bit of coding, I felt way more secure with what I was doing than in the beginning. Of course I still ran into some errors but they were not as big as the ones before and fixed fast. In the end, I worked exactly the way I wanted it to, showing a page with the results once accessed and then filtering them once the form is submitted. I used an if statement for that. To show the results of my search in boxes exactly like the ones on the ‘posting’ page, I created another file (box_search.php) exactly like box.php and did another while look linking to it. In the end it showed the results perfectly. In the following you can see the PHP code for it:


<?php
 if(isset($_POST['sort'])) { //Only if the form above is submitted.
 $sort = $_POST['sort']; //Declaring the variable $sort.
 $query = "SELECT * FROM posts WHERE place_of_post='{$sort}'"; //Query to get all the results for the selected place. 
 } else {
 $query = "SELECT * FROM posts"; //If no place is selected, show all. 
 }

 $result = mysqli_query($connect, $query);
 
 while($row = mysqli_fetch_assoc($result)) {
 include 'box2.php'; //The while loop is used to include the file box2.php for each post matching the criteria.
 }
 ?>


References:

Mack, Kt. 2014. PHP Mysql query – allow user to filter results. Stackoverflow. Available from: http://stackoverflow.com/questions/21349161/php-mysql-query-allow-user-to-filter-results [Accessed 30th March, 2015].

Xalkia, S., 2013. PHP filter mysql results. Stackoverflow. Available from: http://stackoverflow.com/questions/14387684/php-filter-mysql-results [Accessed 30th March, 2015].

Net neutrality

After our lecture today, I did some reading about “Net neutrality”.

Before I start talking about recent news and giving more detailed information about “Net neutrality”, I should explain and define what it is and why we all should care and know about it.

What is Net neutrality?

To quote ocf.berkeley.edu, “Net neutrality […] is a network design paradigm that argues for broadband network providers to be completely detached from what information is sent over their networks.  In essence, it argues that no bit of information should be prioritized over another.” So, what does that mean? Basically, that the internet is “most efficient and useful to the public when it is less focused on a particular audience and instead attentive to multiple users.”

For example: “Let’s say you use Hulu and Netflix, and often switch between the two to see what’s on. Supporters of net neutrality say that your broadband Internet service provider (ISP) should not be able to charge either Netflix or Hulu, or any other company that depends on the Internet, for a faster connection to you and other customers. Nor should the ISP be able to charge you more to access certain services.” (Trotter, J., K.) Meaning that network providers could choose to decide how fast data would be transmitted and at what quality. As a result it could come to unfair treatment and even discrimination as well as high prizes and a position of power for the providers. Because in that case some information would be accessed much slower than other, users would desire the information they have a fast access to and in the end, this way network providers could have a hand in creating monopoles or oligopolies.

Some quotes I found doing my research were by Eric Schmidt, the CEO of Google and Tim Wu, a Professor at Columbia Law School:

A neutral network might be designed without legal prodding – as in the original internet.   In an ideal world, either competition or enlightened self-interest might drive carriers to design neutral networks.

– Tim Wu (Professor at Columbia Law School)

Creativity, innovation and a free and open marketplace are all at stake in this fight”

– Eric Schmidt (Google CEO)


References:

Lin, R., unknown. Network Neutrality. Available from: https://www.ocf.berkeley.edu/~raylin/whatisnetneutrality.htm [Accessed on: 25th March 2014].

Trotter, J., K., 2014. What is Net Neutrality and why should I care? The Non-Geek’s Guide. Available from: http://gawker.com/what-is-net-neturality-and-why-should-i-care-the-non-g-1657354551 [Accessed on: 25th March 2014].

The Guardian, 2015. Net neutrality. Available from: http://www.theguardian.com/technology/net-neutrality [Accessed on: 25th March 2014].

Baker, J., 2015. EU annoys industry and activists with net neutrality proposal. Available from: http://www.theregister.co.uk/2015/03/05/net_neutrality_eu_ministers_proposals_treated_with_suspicion/ [Accessed on: 25th March 2014].

Edit and Delete button for Posts

After our meeting with Rob last Friday, I have been working on a “delete” and an “edit” button for the posts on our page. I knew it would be very similar to the code I had previously written for the “delete-account” button but also that I was faced with some complications.

First of all, the users had to be able to only delete their own posts. For that, I knew I would need the “user_id” that I previously saved as a session variable, so I could run a query checking if the “id” from the user table would be the same as the “user_id” in the posts table. Luckily, at this point I had already managed to save the “user_id” from the SESSION in the posts table. That made this whole thing a bit simpler, because I did not have to take care of that in addition, but could just run a simple check to ensure that the two numbers were the same.

Once that was accomplished, I thought about the second problem that I had to solve. At this point the user would click a button and end up deleting all of his posts no matter which button he picked (as long as it was one of his posts). That happened because the users “id” and the “user_id” from the posts table would be same for all the posts a user made. That meant that the “user_id” to select a certain post was not enough criteria and that I had to query for the post “id” as well.

The solution for that was creating another file, called “delete_post”.php and when doing the “href” adding the unique post “id” to the URL. That happened with the following code:


            <div class="delete_edit" id="delete_post"><a href="delete_post.php?id=<?php echo $row["id"]; ?>">Delete post?</a></div>

I then would get the post “id” and run my query like this:


            $query = "DELETE FROM posts WHERE id = '{$postID}' and user_id = '{$_SESSION['user_id']}'";

In the end the user was able to delete his posts, but not all at once. Instead he could click on the posts’ “delete” button ending up deleting just this one post (of course, still just his own post, not others). That was almost everything and could have probably ended up staying like that but it was slightly distracting that all the posts had “delete” buttons but some of them just would not work. That’s why I used an if-statement to hide the button for all but the users own post. You can see the code here:


<?php if ($_SESSION["user_id"] == $row["user_id"]) {?>

        <div class="delete_edit" id="delete_post"><a href="delete_post.php?id=<?php echo $row["id"]; ?>">Delete post?</a></div>

        <div class="delete_edit" id="edit_post"><a href="edit_post.php?id=<?php echo $row["id"]; ?>">Edit post?</a></div> 

<?php } ?>

Also, in the following you can see a screenshot of the “posting-page” so far. All the posts with “edit” and “delete” buttons are the one made by the user logged in. In addition to the buttons’ obvious function, they are also an option for the user to keep track of their posts since they can easily get lost in the mass of anonymity and still stay anonymous (since other people can only see that certain posts were not made by them but not by who).

Screenshot (285)

The “time ago” problem and how I got there

Looking at apps and websites me and my group got our inspiration from there was one thing I realized that we needed so our users could improve their experience using our page: a timestamp for the posts. Imagine accessing the website, looking at the “posting-page” and realizing that you have no idea how old those posts are. They could have been written weeks or even a month ago. Since our whole concept is based around the idea of anonymity and withholding information, we also have to make sure that we do not cut the user off too much. There are a couple of things the user needs to identify with the poster. One of them is the gender, a part we have already integrated. The two other things that were still missing were a place and time. The first thing that had to be done to even think about integrating time was updating the table in the database. Our “posts-table” needed a TIMESTAMP. Since I had already set up one for our “users-table”, it was not very hard to do. A couple of settings had to be adjusted. As you can see in the following photo, I set the TYPE to “timestamp” as well as the DEFAULT to “CURRENT_TIMESTAMP”. Without any extra requirements from the user, every post would automatically be saved with a timestamp.

The easiest option at this point would have been to just echo out the time-stamp with our posts and let the user do the math. But since we wanted to create a user-friendly, easy to use site, I started looking into using the current time and getting the difference between it and the timestamp time. Since I only had a vague idea of how to do that, I was faced with having to do quite a lot of research.

Before I started doing the research, I wrote down a list of things I needed to get more knowledge about:

  1. How to get the current time?
  2. How to get the difference between the current time and the timestamp?
  3. How to convert the whole thing in the right format (“..minutes ago”/”..hours ago”/etc.)?

First, I looked into how to get the current time:

  • For that, I looked at a tutorial from w3schools.com. To my surprise, it was actually not very hard to get the current time. All it needed was PHP’s date() function. Then, I even had a free choice on how the format was going to be. In the following you can see an extract from the tutorial. First the characters needed for dates, then for times:

Screenshot (280) Screenshot (281)

Secondly, I looked into getting the difference between the current time and the timestamp:

To do so, I looked at the website plus2net.com, where I found out that I could use one of PHP’s functions called mktime() to get what I wanted. The function would give out the different between two timestamps in seconds. According to the tutorial I looked at, it was the easiest to “divide the difference in second in different values and taking the floor math value of it.” In the following, you can see an extract from the website, explaining the mathematical principles behind it:

To get the difference in minutes we have to divide by 60

To get the difference in hours we have to divide by 3600 ( 60 minute x 60 seconds )

To get the difference tin days we have to divide by 86400 ( 24 x 60 x 60 )

To get the difference in months we have to divide by 2628000

Also, here you can see a picture of the very first and basic code, I ended up having. Part of it is an extract from the tutorial, part of it, I added from what I had learned.  As you can see, I set the default time zone to “UTC” because my German-Laptop ended up giving me wrong current time. Without it, I would have never noticed. Also, for the current time, I used the format “H:i:s”. Looking at the previously referenced explanations from w3schools, it means a result like “12:12:12”.

Screenshot (275)

Echoed out, my code looked like this (you can see the differences as well as the current timestamp at the end):Screenshot (273)

Thirdly, I looked into the format:

This was the part, where I got stuck. I wanted the posts to have a nice little “..ago” field with information and not a whole block of confusing numbers and dates. I looked into this and after hours of trying around, I ended up at the following tutorial:

It explained the whole thing from the very beginning, so I could freshen up everything I had learned and because it gave a lot of additional ideas and suggestions, I ended up redoing my code from the very beginning. The tutorial ended up writing two functions that then easily could be used to echo out the time in my wanted format. I followed it and ended up with two functions in my “functions.php” file. Because I knew that I would reference the tutorial in my code, I stuck to the function names the tutorial suggested and just changed some small things while writing the code. One of them was adding the default time zone again, for example. If you look at the functions, you can see that the first one converts into a timestamp in the “2015-01-01 12:12:12” format and the second one gives out the differences between the time and the timestamp-time.

<?php

class convertToAgo {

 function convert_datetime($str) {
 //sets the timezone to UTC
 date_default_timezone_set('UTC');
 
 list($date, $time) = explode(' ', $str);
 list($year, $month, $day) = explode('-', $date);
 list($hour, $minute, $second) = explode(':', $time);
 $timestamp = mktime($hour, $minute, $second, $month, $day, $year);
 return $timestamp;
 
 }

 function makeAgo($timestamp){
 
 $difference = time() - $timestamp;
 $periods = array("sec", "min", "hr", "day", "week", "month", "year", "decade");
 $lengths = array("60","60","24","7","4.35","12","10");
 for($x = 0; $difference >= $lengths[$x]; $x++){
 $difference /= $lengths[$x];
 $difference = round($difference);
 }
 if($difference != 1) $periods[$x].= "s";
 $text = "$difference $periods[$x] ago";
 return $text;
 
 }
} 

?>

</pre>
<pre>

 <div class="time_ago" <h2><?php echo "..".$when; ?></h2> </div>

And here you can see the actual result in the top left corner:

Screenshot (284)


References:

W3Schools, unknown. PHP 5 Date and Time. Available from: http://www.w3schools.com/php/php_date.asp [Accessed 17th March 2015].

Plus2net, unknown. PHP Date Difference calculation using mktime function. Available from: http://www.plus2net.com/php_tutorial/date-diff.php [Accessed 17th March 2015].

DevelopPHP, unknown. Convert MySQL Timestamp to Ago Time Format OOP Tutorial. Available from: https://www.developphp.com/video/PHP/Convert-MySQL-Timestamp-to-Ago-Time-Format-OOP-Tutorial [Accessed 18th March 2015].

Finding a name

Tina took on the task to find a name /logo for our website. Doing that, she asked the rest of the group if they had any ideas and then put together a Mind-Map. While our trip to the beach, we thought about maybe using something animal related, preferable the turtle since it is a sea animal, but we did not have a clear idea of what exactly.

So, she made the Mind Map and then we talked a bit about what she thought of and we added some other possible ideas. The name was supposed to aim at students and we thought it would be nice to relate it somehow to “talking” since the whole idea is based around students sharing small stories.

Here you can see the Mind-Map Tina put together:

11039382_841807095892637_1091697328_n

Possible names were for example “Hidden Messages”, “Anonymous Turtle” or “Turtle Posts”. We then did a little vote and the three names that we liked most were:

  1. Turtle Talks
  2. Ghost Mail
  3. Unipost

If you want to read more about that, you can look at Tina’s Blog that is references below.


References:

Sabine, T., 2014. Tina’s Blog. Available from: https://christinasabine.wordpress.com/ [Accessed on the 11th March 2014]

PHP: Confirm Password

To stop our webpage from having thousands of accounts that are not being used because people entered their passwords wrong and then had to sign up again, we chose to set up a confirm password field. Because I was not sure how to do it, I had to do some research. I found a YouTube tutorial that explained the whole thing very well. You can see it below:

To make sure I had the knowledge to set it up, I then read some threads on stackoverflow.com where people tried to do similar things. I will cite them in my references. Then, I moved to our code. The very first thing I needed was the field. So, I added that to the form we already had in the index.php file:


<input type="password" name="confirm_password" value="" placeholder="Confirm Password"/>

The rest that was needed was to compare the two entered passwords and send out an alert message in case they would not match. You can see the code I used for that in the following:


&amp;lt;?php

    if(isset($_POST[&amp;quot;signup&amp;quot;])) {

        …

        $password = $_POST['password'];

        $confirm_password = $_POST['confirm_password'];

        …

        if ($password != $confirm_password) {

            $if ($password != $confirm_password) {
             $message = "Passwords do not match. ";
             echo '<div class="message">'.$message.'</div>';

        …

        } else {

            $query = "INSERT INTO users (name, password, student_id, gender) VALUES ('{$name}', '{$password}', '{$student_id}','{$gender}')";

            $result = mysqli_query($connect, $query); 

            $message = "Your account has been registered!";

            echo $message; 

                if($result) {

                        $message = "Success, your account was added!";   

                    } else {

                        $message = "Sorry, something went wrong!"; 

                    }

        …

        $password = ""; 

        $confirm_password = "";

        …


In the end, I tested it. To show that better, I temporarily changed my input type to “text” :

 <input type="text" name="password" value="" placeholder="Password"/>
 <input type="text" name="confirm_password" value="" placeholder="Confirm Password"/>

In the picture, you can see me entering two different passwords and then the alert message at the top of the page:

 Screenshot (264) Screenshot (265)


References:

Learn More, 2013. PHP & MySQL Confirm Password. Available from: https://www.youtube.com/watch?v=byAXL0E_5sA [Accessed: 13th March 2015]

User3665022, 2014. Stack Overflow. PHP confirm password and check if user already exists in mySQL [closed]. Available from: http://stackoverflow.com/questions/23806936/php-confirm-password-and-check-if-user-already-exists-in-mysql [Accessed: 13th March 2015]

Vijaykarthik, 2014. Stack Overflow. How to validate email id and password & confirm password in php. Available from http://stackoverflow.com/questions/27216595/how-to-validate-email-id-and-password-confirm-password-in-php [Accessed: 13th March 2015]